Monday, 24 December 2012

Steps to disable report output format available in IBM Cognos 'run with options'

The IBM Cognos 10.2 supports following 'run with options' report output formats-
-HTML
-PDF
-Excel 2007
-Excel 2007 Data
-Excel 2002
-Delimited text (CSV)
-XML

Step 01) Look for 'system.xml' file present at IBM Cognos install path. It can be found at
<C10>\templates\ps location.
  
Step 02) Open 'system.xml' file in editor. And search for supported report output formats as shown below-
<!-- Supported report output formats -->
   <param name="reportFormats">
        <format id="HTML" browserHide="" appMode="basic adv rv"/>
        <format id="XHTML" browserHide="" appMode="adv"/>
        <format id="HTMLFragment" browserHide="" downloadable="false"           appMode="adv"/>
        <format id="PDF" browserHide="" downloadable="true" appMode="basic adv rv" extension="pdf">
        <format id="spreadsheetML" browserHide="safari" downloadable="true" appMode="basic adv rv" extension="xlsx"/> <!-- excel 2007 format -->
        <format id="xlsxData" browserHide="safari" downloadable="true" appMode="basic adv rv" extension="xlsx" />    <!-- excel 2007 data -->
        <format id="XLWA" browserHide="safari" downloadable="true" appMode="basic adv rv" extension="xls" mime="application/vnd.ms-excel"/> <!-- excel 2002 format -->
        <format id="singleXLS" browserHide="safari" downloadable="true" appMode="" extension="xls"/>
        <format id="XLS" browserHide="safari moz other" downloadable="false" appMode="" cafaction="true"/>
        <format id="CSV" browserHide="" downloadable="true" appMode="basic adv rv" extension="csv"/>  
        <format id="XML" browserHide="" downloadable="true" appMode="basic adv rv" extension="xml"/>
    </param> 

Step 03) In order to disable or hide the report output format not required by user, comment the particular 'format id' in step 02. There are 07 possible report output formats available with IBM Cognos 10.2 'run with options' drop down button.


Step 04) Restart the IBM Cognos BI server so that the changes made in the 'system.xml' file get reflected.

Wednesday, 28 November 2012

Configuring IBM Cognos 8 and Cognos 10.1.1 to use NTLM Namespace

IBM Cognos components can be configured to use the Microsoft windows operating system native security i.e. NT LAN Manager (NTLM) as the authentication source.

Step 01) Open IBM Cognos Configuration on the machine where Content Manager(CM) is installed. In the Explorer window, under Security, right-click Authentication, and click New resource, Namespace. 

Step 02) In the Name box, type a name of your authentication namespace. In the Type list, choose NTLM and click OK. 

Step 03) The new authentication provider resource appears in the Explorer window, under the Authentication component. In the Properties window for the NamespaceID property, specify a unique identifier for the namespace ID. Specify the values for all other required properties to ensure that IBM Cognos components can locate and use your existing authentication provider. Here ENT is taken as NTLM domain name.

Step 04) From the File menu, click Save. Test the connection to a new namespace. In the Explorer window under Authentication, right-click on myNTLM and click Test.


Step 05) Open Cognos Gateway URI in a web browser. It should prompt for authentication. The credentials used for windows machine authentication will work here.


Monday, 26 November 2012

Steps to increase zFS File System size dynamically in the WebSphere Application Server (WAS) on zOS

The 'zFS' stands for zSeries File System. It's newest Portable Operating System Interface (POSIX)-style hierarchical file system for IBM's z/OS operating system. The zFS as a separate entity was initially released as PTFs (patches) for z/OS 1.2.
But now the zFS is included as a standard feature beginning with z/OS 1.3.

Step 01) Go to bin directory of WebSphere Application Server(WAS) base installation
Look for 'zCreateConfigFileSystem.sh' script at given locations-

/WAS800/zWebSphere/V8R0/bin  (For WAS8)
/WAS850/zWebSphere/V8R5/bin  (For WAS8.5)

Step 02) Edit 'zCreateConfigFileSystem.sh' script
Add EXTADDR parameter in the script as shown below in the red colour-

# ZFS configuation file system requested
else
        # Define vsam linear data set
        printMessage CWLCS0023I "$fileSystemName"
        if [[ -z "$volume" ]]; then
                zfsadm define -aggregate "$fileSystemName" -cylinders "$primaryCylinders" "$secondaryCylinders" -dataclass EXTADDR
        else
                zfsadm define -aggregate "$fileSystemName" -volumes "$volume" -cylinders "$primaryCylinders" "$secondaryCylinders" -dataclass EXTADDR
        fi

Step 03) Save the script file.
Now whenever ZFS File System will fall short of size, it will dynamically grow in size to to accommodate as per the new requirements.

Wednesday, 7 November 2012

Configure Microsoft IIS web server for IBM Cognos 10.2 on Windows7 platform


Step 01) Configure an Application Pool

1) Go to Start > Administrative Tools, right-click on Internet Information Services (IIS) Manager and select Run as administrator.


2)Expand on the <server name> which is located under the Start Page, then expand on Application Pools.
3)Click on "Add Application Pool..." from the "Actions" pane on the right side.


4)Provide the required details in the New Application Pool dialog.


5)Click OK
6)Now back to IIS Manager's left explorer pane, select the newly created Application Pool and click Advanced Settings under Edit Application Pool within the Actions tool pane on the right.


7)For 64-bit installs of IIS, select the "Enable 32-bit Applications" setting and set the value to "True".
And change the "Start Automatically" setting to "True".


8)Click OK
9)Go to IIS Manager's left explorer pane select the newly created application pool and click Start under Application Pool Tasks within the Actions tool pane on the right.


Step 02) Create The IBM Cognos 10 Virtual Directory
 
1)In the IIS Manager's left explorer pane, expand Sites and Default Web Site.
2)Right-click the Default Web Site and select Add Virtual Directory.


3)Provide the required details for the "Add Virtual Directory" dialog. And press OK to save the changes.


Step 03) Create An Application for cgi-bin

When an IIS Application for cgi-bin is created it will map the IBM Cognos gateway modules to the application pool created earlier.

1) In the IIS Manager's left explorer pane find the virtual directory "ibmcognos" created earlier. Right-click on the virtual directory and select Add Application.


2)In the Application pool: field, select the application pool created earlier i.e "IBM Cognos 10" by by clicking on the "Select..." button. 
And press OK to save the changes.


Step 04) Configuring IIS 6 for IBM Cognos CGI

1)Select the "cgi-bin" application from the Default Web Site > ibmcognos tree in the left pane of IIS Manager. Select the "Features View" from the lower bar in the middle pane.
2) Look for "Handler Mappings" in the middle pane.


3)Double-click on "Handler Mappings" in the middle pane.
This will bring up the list of handler mappings for this application in the middle pane.
In the upper right Actions pane, click "Add Module Mapping" to add the CGI mapping.


4)Provide the required details for the Add Module Mapping dialog.
Request path: specify "cognos.cgi"
Module: select "cgiModule" from the dropdown list.
Executable (optional): field should be left blank.
Name: module name such as IBMCOGNOS-CGI


NOTE- If you can't see 'CgiModule' in the above Module drop down. Then please install CGI module in IIS web server on your machine.
Please refer below link-
http://www.iis.net/configreference/system.webserver/cgi

5)Click OK to save.
6)Go back at the "Handler Mapping" page, "IBMCOGNOS-CGI" should appear under the Enabled section.


7)With the newly created mapping i.e. "IBMCOGNOS-CGI" selected, click "Edit Feature Permissions" from the upper right Actions pane.
8)In the "Edit Feature Permissions" dialog, check the "Execute" checkbox to enable CGI execution.

9)Click OK.

Step 05) Setting the CGI Restrictions for the Web Server

1)In the IIS Manager, select the web server in the tree view on the left and in the content pane select the "Features View" tab at the bottom. Look for "ISAPI and CGI Restrictions" feature.


2)Double-click on the "ISAPI and CGI Restrictions" feature. This will bring up the list of defined restrictions in the middle pane of IIS Manager.
3)In the upper right Actions pane, click Add...


4)Provide the necessary details in the "Add ISAPI or CGI Restriction" dialog.
-In the ISAPI or CGI Path:  give complete path to the "cognos.cgi" file
-In the Description: specify a description of the restriction like "IBMCOGNOS-CGI" -Make sure that the check-box for "Allow extension path to execute" is checked
-Click OK


Step 05) Testing the CGI installation
-Open Cognos Gateway URI "http://<webserver>/<alias>/cgi-bin/cognos.cgi" in a web browser. It should get opened properly.
For example in our case it is- 
http://localhost:80/ibmcognos/cgi-bin/cognos.cgi 


Thursday, 1 November 2012

Enable WebDAV for use in IBM Cognos Report Studio

In order to insert a logo or image in the IBM Cognos Report on Red Hat Enterprise Linux (RHEL) platform, a customer needs to enable WebDAV on HTTPS server.

What is WebDAV?
WebDAV stands for Web Distributed Authoring and Versioning (WebDAV) is an extension of the Hypertext Transfer Protocol (HTTP) that facilitates collaboration between users in editing and managing documents and files stored on World Wide Web servers.

How to enable WebDAV on HTTPS Server?
01) Open 'httpd.conf' file present at path something like "/opt/IBM/IHS/HTTPServer/conf". Uncomment these 02 lines-
LoadModule dav_module modules/mod_dav.so
LoadModule dav_fs_module modules/mod_dav_fs.so

02) Go to Virtual Hosts section in 'httpd.conf' file.
Add these entries-
<VirtualHost *:80>
     Alias /image "/opt/ibm/cognos/c10_64/webcontent/samples/images"
         <Directory "/opt/ibm/cognos/c10_64/webcontent/samples/images">
             Options Indexes FollowSymLinks
             AllowOverride None
             order allow,deny
             allow from all
             AuthType Basic
             DAV On
         </Directory>
</VirtualHost>

03) Save and re-start HTTPS server.
04) Give necessary permission to the webcontent, sample and images directory.
05) Open a report in IBM Cognos Report Studio.
Go to Toolbox and drag 'Image' to right side.
Now click on the Image and give web URL-
http://<server IP>:80/image/pic1.jpg

06) Save and run the report. The logo/images will be reflected in an existing IBM Cognos Report Studio Report.

Friday, 26 October 2012

WAS 8.5 and Liberty Profile

What is WAS 8.5?
  • It is a proven, high-performance transaction engine that can help to build, run, integrate, and manage dynamic business applications. 
  • It introduces the concept of dynamically adding applications  
  • It does not requires server re-start after adding any applications on Liberty profile
What is new in WAS 8.5?
  • New Liberty profile: a lightweight application foundation
  • Fast, flexible, and simplified application development
  • Intelligent Management and enhanced resiliency 
  • Integrated tools 
  • Improved operations, security, control, and integration 
Why Liberty on z/OS? 
  • Improved performance  
  • It is included with all the commercial editions of WAS 8.5 server 
  • It provides a lightweight profile of the server for web, mobile and OSGi applications
  • It is a functional subset of the full profile of WebSphere Application Server, for both development and production use
  • Install size of under 50 MB, a start up time of around 03 seconds and a new XML-based server configuration
Liberty Profile Installation
   There 02 ways to install Liberty profile-
     1) Unzip jar file ‘wlp-developers-8.5.0.0.jar’
     It creates following directories-
     bin, clients, dev, lafiles, lib, templates, usr   

    2) Install Eclipse Java EE IDE for Web Developers (Indigo Service Release 2).
    Select the install icon for WAS V8.5 Liberty Profile. 
   https://www.ibm.com/developerworks/mydeveloperworks/blogs/wasdev/entry/download_wlp?lang=en
   Drag it onto the menu bar in Eclipse IDE(Integrated Development Environment). 

   And then follow the prompts.

Install directory created for Liberty  Profile

 'Usr' directory contains server instances with their configuration and applications

Liberty Profile Architecture 


Deploy Applications on Liberty
  • Drop new application into dropins directory, the application is automatically deployed on the server 
  • Location of dropins directory: wlp/usr/servers/server1/dropins

Liberty Profile Commands

    1) To create new Liberty server
    bin> server.bat create <serverName> (windows)
    bin> server create <serverName> (other Platform) 
   
    2) To start Liberty server  
    bin> server.bat start <serverName> (windows)
    bin> server start <serverName> (other Platform)
 

   3) To stop Liberty server
   bin> server.bat stop <serverName> (windows)
   bin> server stop <serverName> (other Platform)  

NOTE: Commands may slightly differ for different Operating Systems.
The user needs to set JAVA_HOME & PATH pointing to JDK install path.


Features of Liberty Profile 
  1. Unlike traditional WAS on z/OS, the Liberty Profile server instance is a single JVM rather than the multiple JVM model used by traditional WAS on z/OS. 
  2. Configuration of Liberty Profile server instances is done by editing the 'server.xml' file and a small set of other optional files.
  3. There is no "Administrative Console" for Liberty Profile.
  4. The Liberty Profile is designed to be composable, lightweight, dynamic and fast.
  5. Liberty Profile does not support EJB (Enterprise JavaBeans) applications at this point of time. 
  6. It only supports JEE Web modules and Enterprise applications.
  7. To install an application on Liberty profile, just place your application file into the dropins directory. 
  8. Liberty profile kernel will identify application files placed in the dropins directory to install them.

Thursday, 4 October 2012

IBM Cognos Audit Reporting

The large software systems and applications have logs for various things which can be useful for debugging, data mining and analysis. When an application or a system crashes then the error details found in such logs are useful for the investigation purpose.
By default there is only one IBM Cognos logging target “File.” This set up has the various Cognos components logging to 'cogserver.log' file. The log files are useful for administrator since it can be used to watch the log as events occur.
If a customer have requirement for Cognos audit reporting then he can follow the below steps-

1) Route IBM Cognos log messages to a different database. It should be different from the Content Store database.
a) Open IBM Cognos Configuration window
Under Environment -> right click Logging -> click New Resource ->Destination
 
Type the name and select the db type of destination & click OK.

b) Now right-click on the newly created 'Audit_db' and select New Resource -> Database
Type the name of the db, select the db type and click OK.
 
Give following details for the new db-
-Database server with port number or instance name
-User ID and password
-Database name

c) On IBM Cognos Configuration window.
From File menu -> click Save and then click Re-start button.
It will create all the necessary tables in the db you have created.
And all newly created tables have a prefix "COGIPF_" as shown below-
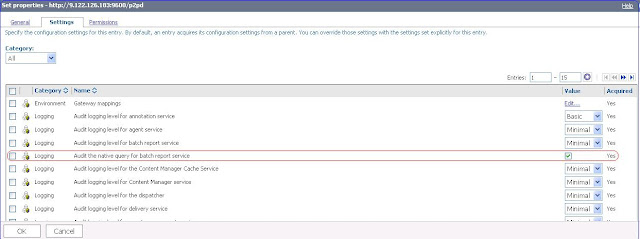
2) Edit the logging level for audit reports. Choose the options Minimal, Basic, Request, Trace and Full from given drop down.

3) Enable the "Audit the native query for batch report service" logging. Click OK.


Wednesday, 7 March 2012

MNREGA Scheme- a misuse of taxpayer's money?

MNREGA stands for Mahatma Gandhi National Rural Employment Guarantee Act. In short this govt scheme is referred to as NREGA scheme. It was enacted by central govt legislation on August 25, 2005. This scheme provides a legal guarantee for 100 days of employment in every financial year to adult members of any rural household willing to do public work at the statutory minimum wage of INR 120 per day.

The Central government outlay for NREGA scheme was 40,000 crore (US$8.8 billion) in financial year 2010–11. But the biggest question is whether the real benefit is reaching to the unemployed needy people? The reports of NREGA funds being misused is very common in remote villages. There is a need to make people aware of NREGA social audit process.

The benefits of this scheme is not reaching to the poor people, instead it’s making people richer who are supposed to facilitate this scheme to village GRAM PANCHAYAT level.

A few facts about MNREGA:
1) Mahatma Gandhi National Rural Employment Guarantee Act (MGNREGA) was launched on 2nd February, 2006 from Anantapur in Andhra Pradesh and initially covered 200 “poorest” districts of the country.
2) The Act was implemented in phased manner – 130 districts were added in 2007–08. With its spread over 625 districts across the country.
3) The law was initially called the National Rural Employment Guarantee Act (NREGA) but was renamed on 02 October 2009 to Mahatma Gandhi National Rural Employment Guarantee Act (MGNREGA)
4) This act was introduced with an aim of improving the purchasing power of the rural people, primarily semi or un-skilled work to people living in rural India, whether or not they are below the poverty line.
5) Around one-third of the stipulated work force should be women.
6) Under the MGNREGA the Central Government meets the cost towards the payment of wage, 3/4 of material cost and some percentage of administrative cost. State Governments meet the cost of unemployment allowance, 1/4 of material cost and administrative cost of State council.
7) The national budget for the financial year 2009–2010 for MNREGA was Rs. 391 billion.
8) The MNREGA Job Card should be issued within 15 days of application.
9) Employment should be given within 15 days of application for work, if it is not then daily unemployment allowance as per the Act, has to be paid. The liability of payment of unemployment allowance is of the State Govts.
10) A person is entitled to a daily unemployment allowance of not less than one-fourth the wage rate for the first 30 days. For payment of unemployment deduction can be made from the salary of the gram panchayat secretary and paid to the workers.
11) A Job Card holder may submit a written application for employment to the Gram Panchayat, stating the time and duration for which work is sought.
12) The Gram Panchayat will issue a dated receipt of the written application for employment, against which the guarantee of providing employment within 15 days operates.
13) Work should ordinarily be provided within 5 km radius of the village. In case work is provided beyond 5 km, extra wages of 10% are payable to meet additional transportation and living expenses.
14) Disbursement of wages to labour has to be done on weekly basis and not beyond a fortnight in any case.
15) Permissible works predominantly include water and soil conservation, afforestation and land development works.
16) A 60:40 wage and material ratio has to be maintained. No contractors and machinery is allowed.
17) The Central Govt. bears the 100 percent wage cost of unskilled manual labour and 75 percent of the material cost including the wages of skilled and semi skilled workers
18) It is also widely criticized that NREGS has contributed to farm labour shortage.
19) Dr. Jean Drèze, a Belgian born economist, at the Delhi School of Economics, has been a major influence on MNREGA projecy.

Is central government wasting the hard earned money of tax-payers? If govt is implementing job guaranty schemes for rural unemployed youth, it should make sure the money is not diverted somewhere else. There is an urgent need of enquiry into the financial health of all past and present Sarpanch/Gram Pradhan's to ascertain their all movable and immovable assets & their source of income.