Step 1) Extract 'Rave_JavaSDK_1.7.0.D20140507-0101.zip' file at local path
Step 3) Go to bin of extracted JavaSDK path
C:\Rave\Rave_JavaSDK_1.7.0.D20140507-0101\bin
<Rave_JavaSDK_1.7>\bin
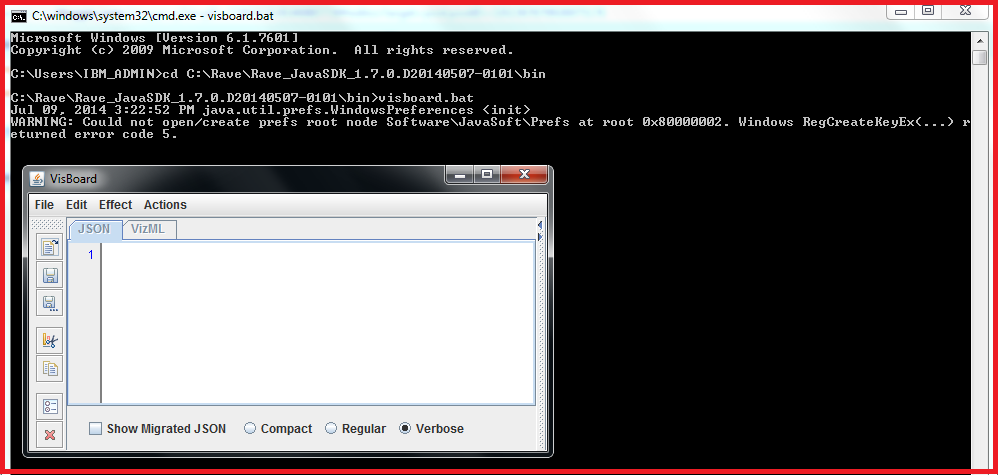
Step 4) Hit below command
C:\Rave\Rave_JavaSDK_1.7.0.D20140507-0101\bin>visboard.bat
May 14, 2014 1:43:31 AM java.util.prefs.WindowsPreferences <init>
WARNING: Could not open/create prefs root node Software\JavaSoft\Prefs at root 0x80000002. Windows RegCreateKeyEx(...) r
eturned error code 5.
Step 5) It will launch VisBoard
VisBoard have JSON and VizML

Step 6) Launch VisCustomizer.jar
IBM Cognos Visualization Customizer framework.
Copy from here- "https://www.analyticszone.com/homepage/web/displayMarketplacePage.action#catalog/assets_viscustomizer"
And put it at your local path.
Double click 'VisCustomizer.jar' file, it will open a new window to accept licenses-
Click I agree.
It will instantly update 'VisualizationCustomizer.properties' file with following details-
#Wed July 9 10:58:29 IST 2014
version=1.1
license.accepted=true
NOTE- Please install JRE7 32 bit (jre-7-windows-i586.exe) on your machine first. Then double click 'VisCustomizer.jar', it will open IBM Cognos Visualization Customizer window-
Step 7) Go to File -> open visJSON file
Look for file something like "implementation.json"
Step 2) Install jdk7 and set JAVA_HOME system variable
jdk7: jdk-7u51-windows-x64
JAVA_HOME=C:\Program Files (x86)\IBM\Java70\jre\bin
Step 3) Go to bin of extracted JavaSDK path
C:\Rave\Rave_JavaSDK_1.7.0.D20140507-0101\bin
<Rave_JavaSDK_1.7>\bin
Step 4) Hit below command
C:\Rave\Rave_JavaSDK_1.7.0.D20140507-0101\bin>visboard.bat
May 14, 2014 1:43:31 AM java.util.prefs.WindowsPreferences <init>
WARNING: Could not open/create prefs root node Software\JavaSoft\Prefs at root 0x80000002. Windows RegCreateKeyEx(...) r
eturned error code 5.
Step 5) It will launch VisBoard
VisBoard have JSON and VizML

Step 6) Launch VisCustomizer.jar
IBM Cognos Visualization Customizer framework.
Copy from here- "https://www.analyticszone.com/homepage/web/displayMarketplacePage.action#catalog/assets_viscustomizer"
And put it at your local path.
Double click 'VisCustomizer.jar' file, it will open a new window to accept licenses-
Click I agree.
It will instantly update 'VisualizationCustomizer.properties' file with following details-
#Wed July 9 10:58:29 IST 2014
version=1.1
license.accepted=true
NOTE- Please install JRE7 32 bit (jre-7-windows-i586.exe) on your machine first. Then double click 'VisCustomizer.jar', it will open IBM Cognos Visualization Customizer window-
Step 7) Go to File -> open visJSON file
Look for file something like "implementation.json"


