Wednesday, 9 July 2014

How to setup and use IBM Cognos Rapidly Adaptive Visualization Engine(RAVE)?

Step 1) Extract 'Rave_JavaSDK_1.7.0.D20140507-0101.zip' file at local path


Step 2) Install jdk7 and set JAVA_HOME system variable
jdk7: jdk-7u51-windows-x64 
JAVA_HOME=C:\Program Files (x86)\IBM\Java70\jre\bin 

Step 3) Go to bin of extracted JavaSDK path
C:\Rave\Rave_JavaSDK_1.7.0.D20140507-0101\bin
<Rave_JavaSDK_1.7>\bin

Step 4) Hit below command
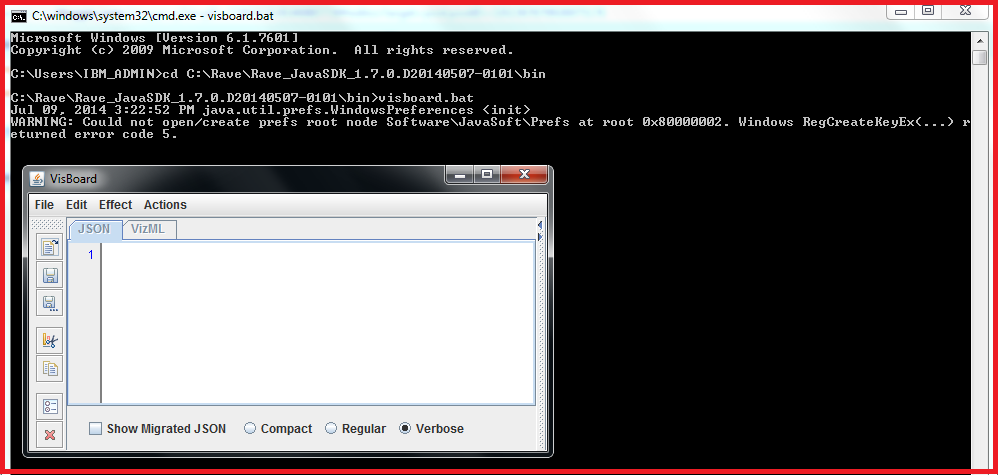
C:\Rave\Rave_JavaSDK_1.7.0.D20140507-0101\bin>visboard.bat
May 14, 2014 1:43:31 AM java.util.prefs.WindowsPreferences <init>
WARNING: Could not open/create prefs root node Software\JavaSoft\Prefs at root 0x80000002. Windows RegCreateKeyEx(...) r
eturned error code 5.

Step 5) It will launch VisBoard
VisBoard have JSON and VizML


Step 6) Launch VisCustomizer.jar
IBM Cognos Visualization Customizer framework.
Copy from here-  "https://www.analyticszone.com/homepage/web/displayMarketplacePage.action#catalog/assets_viscustomizer"
And put it at your local path.


Double click 'VisCustomizer.jar' file, it will open a new window to accept licenses-


Click I agree.
It will instantly update 'VisualizationCustomizer.properties' file with following details-
#Wed July 9 10:58:29 IST 2014
version=1.1
license.accepted=true


NOTE- Please install JRE7 32 bit (jre-7-windows-i586.exe) on your machine first. Then double click 'VisCustomizer.jar', it will open IBM Cognos Visualization Customizer window-


Step 7) Go to File -> open visJSON file
Look for file something like "implementation.json"

Tuesday, 22 April 2014

Steps to install IBM InfoSphere BigInsights on Windows7

Step 1) Install VMware Workstation(Player)
Download Workstation 9.0 for Windows-
https://my.vmware.com/web/vmware/details?productId=293&downloadGroup=WKST-900-WIN

Download VMware Workstation 10.0.2 for Windows-
https://my.vmware.com/web/vmware/details?downloadGroup=WKST-1002-WIN&productId=362&rPId=5403
 

While installation on windows 7:
- Choose typical option
- Skip the step 'Enter License key' since it's optional

Step 2) Go to Start -> All Programs -> VMware -> Click VMware Player


Step 3) Choose option 'Create a New Virtual Machine'


Step 4) Choose option 'I will install the operating system later'


Step 5) Choose red highlighted options for Guest operating system and Version as shown 


Step 6) Keep default name for Virtual machine name and Location. or you can change as per your wish

Step 7) Choose option 'Store virtual disk as a single file'


Step 8) Click Finish button


Step 9) Go to Start -> All Programs -> VMware -> Click VMware Player
Select the newly created Virtual Machine name under Home


Step 10) Choose option 'Edit virtual machine settings'


Step 11) Choose highlighted option and click remove button


Step 12) After removing there should be no Hard Disk(SCSI) option as shown


Step 13) Download IBM InfoSphere BigInsights Quick Start Edition v2.1.2
Choose option to download single node
http://www-01.ibm.com/software/data/infosphere/biginsights/quick-start/downloads.html
https://www14.software.ibm.com/webapp/iwm/web/preLogin.do?source=swg-ibmibqsevmw

Once download is finished you will get 'iibi2120_QuickStart_Single_VMware.7z' file.
Unzip the above downloaded file to get below 02 file-
RHEL55-64.vmdk   ---> It VMware Virtual Disk File
RHEL55-64.vmx     ---> It's VMware Virtual Machine Configuration


Step 14) Click option 'Add'

Step 15) Choose option 'Hard Disk' and click Next


Step 16) Choose option 'SCSI(Recommended)' and click next


Step 17) Go back to Virtual Machine install path on your local disk.
Remove .vmdk file already present & copy RHEL55-64.vmdk file over there

Step 18) Choose option 'Use existing virtual disk' and click next


Step 19) Choose option 'Create a New Virtual Machine'
Click browse button and give path of extracted RHEL55-64.vmdk file present in your local machine.


Step 20) Choose option 'Keep Existing Format'


Step 21) Exit from VMware player and re-open it

Select the installed VM image named 'Red Hat Enterprise Linux 5 64-bit'

Then click 'Play virtual machine' option


Step 22) You will get this message then exit from your VMware player


Step 23) Go to your BIOS settings -> Press F10 (depends on your machine type) -> Enable Virtualization Technology -> Press F10 save and exit

Step 24) Re-open VMware player and click Play virtual machine
It should get opened successfully. Wait for system to get auto configured.
Refer below 02 product documentation pdf files-
iibi2120_QuickStart_VM_readme.pdf
iibi2100_QuickStart_VMs_readme.pdf
It contains login credentials.

Step 25) Your first window of IBM InfoSphere BigInsights will look like this


Monday, 24 December 2012

Steps to disable report output format available in IBM Cognos 'run with options'

The IBM Cognos 10.2 supports following 'run with options' report output formats-
-HTML
-PDF
-Excel 2007
-Excel 2007 Data
-Excel 2002
-Delimited text (CSV)
-XML

Step 01) Look for 'system.xml' file present at IBM Cognos install path. It can be found at
<C10>\templates\ps location.
  
Step 02) Open 'system.xml' file in editor. And search for supported report output formats as shown below-
<!-- Supported report output formats -->
   <param name="reportFormats">
        <format id="HTML" browserHide="" appMode="basic adv rv"/>
        <format id="XHTML" browserHide="" appMode="adv"/>
        <format id="HTMLFragment" browserHide="" downloadable="false"           appMode="adv"/>
        <format id="PDF" browserHide="" downloadable="true" appMode="basic adv rv" extension="pdf">
        <format id="spreadsheetML" browserHide="safari" downloadable="true" appMode="basic adv rv" extension="xlsx"/> <!-- excel 2007 format -->
        <format id="xlsxData" browserHide="safari" downloadable="true" appMode="basic adv rv" extension="xlsx" />    <!-- excel 2007 data -->
        <format id="XLWA" browserHide="safari" downloadable="true" appMode="basic adv rv" extension="xls" mime="application/vnd.ms-excel"/> <!-- excel 2002 format -->
        <format id="singleXLS" browserHide="safari" downloadable="true" appMode="" extension="xls"/>
        <format id="XLS" browserHide="safari moz other" downloadable="false" appMode="" cafaction="true"/>
        <format id="CSV" browserHide="" downloadable="true" appMode="basic adv rv" extension="csv"/>  
        <format id="XML" browserHide="" downloadable="true" appMode="basic adv rv" extension="xml"/>
    </param> 

Step 03) In order to disable or hide the report output format not required by user, comment the particular 'format id' in step 02. There are 07 possible report output formats available with IBM Cognos 10.2 'run with options' drop down button.


Step 04) Restart the IBM Cognos BI server so that the changes made in the 'system.xml' file get reflected.

Wednesday, 28 November 2012

Configuring IBM Cognos 8 and Cognos 10.1.1 to use NTLM Namespace

IBM Cognos components can be configured to use the Microsoft windows operating system native security i.e. NT LAN Manager (NTLM) as the authentication source.

Step 01) Open IBM Cognos Configuration on the machine where Content Manager(CM) is installed. In the Explorer window, under Security, right-click Authentication, and click New resource, Namespace. 

Step 02) In the Name box, type a name of your authentication namespace. In the Type list, choose NTLM and click OK. 

Step 03) The new authentication provider resource appears in the Explorer window, under the Authentication component. In the Properties window for the NamespaceID property, specify a unique identifier for the namespace ID. Specify the values for all other required properties to ensure that IBM Cognos components can locate and use your existing authentication provider. Here ENT is taken as NTLM domain name.

Step 04) From the File menu, click Save. Test the connection to a new namespace. In the Explorer window under Authentication, right-click on myNTLM and click Test.


Step 05) Open Cognos Gateway URI in a web browser. It should prompt for authentication. The credentials used for windows machine authentication will work here.


Monday, 26 November 2012

Steps to increase zFS File System size dynamically in the WebSphere Application Server (WAS) on zOS

The 'zFS' stands for zSeries File System. It's newest Portable Operating System Interface (POSIX)-style hierarchical file system for IBM's z/OS operating system. The zFS as a separate entity was initially released as PTFs (patches) for z/OS 1.2.
But now the zFS is included as a standard feature beginning with z/OS 1.3.

Step 01) Go to bin directory of WebSphere Application Server(WAS) base installation
Look for 'zCreateConfigFileSystem.sh' script at given locations-

/WAS800/zWebSphere/V8R0/bin  (For WAS8)
/WAS850/zWebSphere/V8R5/bin  (For WAS8.5)

Step 02) Edit 'zCreateConfigFileSystem.sh' script
Add EXTADDR parameter in the script as shown below in the red colour-

# ZFS configuation file system requested
else
        # Define vsam linear data set
        printMessage CWLCS0023I "$fileSystemName"
        if [[ -z "$volume" ]]; then
                zfsadm define -aggregate "$fileSystemName" -cylinders "$primaryCylinders" "$secondaryCylinders" -dataclass EXTADDR
        else
                zfsadm define -aggregate "$fileSystemName" -volumes "$volume" -cylinders "$primaryCylinders" "$secondaryCylinders" -dataclass EXTADDR
        fi

Step 03) Save the script file.
Now whenever ZFS File System will fall short of size, it will dynamically grow in size to to accommodate as per the new requirements.

Wednesday, 7 November 2012

Configure Microsoft IIS web server for IBM Cognos 10.2 on Windows7 platform


Step 01) Configure an Application Pool

1) Go to Start > Administrative Tools, right-click on Internet Information Services (IIS) Manager and select Run as administrator.


2)Expand on the <server name> which is located under the Start Page, then expand on Application Pools.
3)Click on "Add Application Pool..." from the "Actions" pane on the right side.


4)Provide the required details in the New Application Pool dialog.


5)Click OK
6)Now back to IIS Manager's left explorer pane, select the newly created Application Pool and click Advanced Settings under Edit Application Pool within the Actions tool pane on the right.


7)For 64-bit installs of IIS, select the "Enable 32-bit Applications" setting and set the value to "True".
And change the "Start Automatically" setting to "True".


8)Click OK
9)Go to IIS Manager's left explorer pane select the newly created application pool and click Start under Application Pool Tasks within the Actions tool pane on the right.


Step 02) Create The IBM Cognos 10 Virtual Directory
 
1)In the IIS Manager's left explorer pane, expand Sites and Default Web Site.
2)Right-click the Default Web Site and select Add Virtual Directory.


3)Provide the required details for the "Add Virtual Directory" dialog. And press OK to save the changes.


Step 03) Create An Application for cgi-bin

When an IIS Application for cgi-bin is created it will map the IBM Cognos gateway modules to the application pool created earlier.

1) In the IIS Manager's left explorer pane find the virtual directory "ibmcognos" created earlier. Right-click on the virtual directory and select Add Application.


2)In the Application pool: field, select the application pool created earlier i.e "IBM Cognos 10" by by clicking on the "Select..." button. 
And press OK to save the changes.


Step 04) Configuring IIS 6 for IBM Cognos CGI

1)Select the "cgi-bin" application from the Default Web Site > ibmcognos tree in the left pane of IIS Manager. Select the "Features View" from the lower bar in the middle pane.
2) Look for "Handler Mappings" in the middle pane.


3)Double-click on "Handler Mappings" in the middle pane.
This will bring up the list of handler mappings for this application in the middle pane.
In the upper right Actions pane, click "Add Module Mapping" to add the CGI mapping.


4)Provide the required details for the Add Module Mapping dialog.
Request path: specify "cognos.cgi"
Module: select "cgiModule" from the dropdown list.
Executable (optional): field should be left blank.
Name: module name such as IBMCOGNOS-CGI


NOTE- If you can't see 'CgiModule' in the above Module drop down. Then please install CGI module in IIS web server on your machine.
Please refer below link-
http://www.iis.net/configreference/system.webserver/cgi

5)Click OK to save.
6)Go back at the "Handler Mapping" page, "IBMCOGNOS-CGI" should appear under the Enabled section.


7)With the newly created mapping i.e. "IBMCOGNOS-CGI" selected, click "Edit Feature Permissions" from the upper right Actions pane.
8)In the "Edit Feature Permissions" dialog, check the "Execute" checkbox to enable CGI execution.

9)Click OK.

Step 05) Setting the CGI Restrictions for the Web Server

1)In the IIS Manager, select the web server in the tree view on the left and in the content pane select the "Features View" tab at the bottom. Look for "ISAPI and CGI Restrictions" feature.


2)Double-click on the "ISAPI and CGI Restrictions" feature. This will bring up the list of defined restrictions in the middle pane of IIS Manager.
3)In the upper right Actions pane, click Add...


4)Provide the necessary details in the "Add ISAPI or CGI Restriction" dialog.
-In the ISAPI or CGI Path:  give complete path to the "cognos.cgi" file
-In the Description: specify a description of the restriction like "IBMCOGNOS-CGI" -Make sure that the check-box for "Allow extension path to execute" is checked
-Click OK


Step 05) Testing the CGI installation
-Open Cognos Gateway URI "http://<webserver>/<alias>/cgi-bin/cognos.cgi" in a web browser. It should get opened properly.
For example in our case it is- 
http://localhost:80/ibmcognos/cgi-bin/cognos.cgi